Nearly 75% internet users abandon a sales funnel before completing a conversion.
Some might consider these visitors a lost cause, well beyond our control as marketers to get back.
Those people are wrong.
You can still target leads who have abandoned your sales funnel. In fact, according to Econsultancy, when marketers retarget those elusive cart-abandoning visitors, they can recover nearly 30% of those seemingly lost conversions.
HubSpot has a variety of tools to help you track abandoned conversions so you can get your valuable leads back.
Tracking Your Conversion Funnel
How you track your conversion funnel depends on your website and your conversion funnel. You can use form submissions if your conversion is a multi-form funnel, or even visits to specific pages if that is applicable to your needs.
In this example, we will be using custom events.
Events are a feature of HubSpot’s Enterprise Edition that allow users to track more customized and segmented actions from website visitors. Many sites that use custom eCommerce checkouts or multi-stage conversion funnels rely on events to track information that is not natively captured by HubSpot.
If you’re using another method to track your conversions—don’t worry. This guide will apply to any method you use to measure your conversion funnel.
Two-Step Conversions
For this example, imagine a HubSpot user who runs an eCommerce website that uses only a two-step conversion funnel. The two steps include:
- Event 1: Payment Screen
- Event 2: Order Confirmation
They simply require a method to capture prospects who complete Event 1, but not Event 2. For this we would turn to HubSpot’s smart lists tool.
- Under the Contacts menu, create a new smartlist
- Select “Event” from the first drop down.

- The second dropdown should read “has had event”.
- On the rightmost drop down, select your first conversion event. In this example, Event 1.
- Click the “Add another requirement” button to add another event
- For the second event, change the second drop down so it shows “has not had event”.

- In the rightmost drop down, select your second and final conversion event. (Event 2).
Now, website visitors who complete Event 1, but do not complete Event 2 will be added to a list.
When you use a smartlist in this way, the user will be added to the list after completing Event 1, but will then be removed once he or she has completed Event 2. That's why you need to take some precautions when creating you workflow:
- In the workflow settings, click yes for "When a contact leaves the starting list, unenroll them from the workflow?" This way, the visitor will be removed from the workflow once Event 2 is completed.
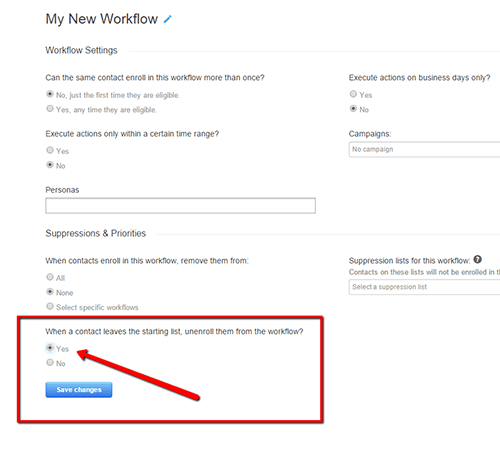
- Make sure you start your workflow with a delay. Again, if you have it set to send an email immediately, people will get an email between completing the two events.
This solution is very easy to use, but it only works if you have a two-step conversion funnel. For larger funnels, we will use HubSpot’s workflows to build more complex systems to add users to your abandoned conversion list.
Longer Conversion Funnels
Not every site has a simple two-step conversion funnel, so let’s look at how we can build an automated list for more complex conversions.
In this example, let’s imagine a customer with a three-step conversion funnel. Once you understand how to manage three steps, you should be able to build up more steps on your own.
- Event 1: Input shipping information
- Event 2: Payment information
- Event 3: Complete Sale
- Create a new workflow under the “Contacts” tab
- In the new workflow screen, select “Completed the Event” from the dropdown menu

- Select the event you want to start your workflow. In this example, it will be Event 1.

- Click “Add action or delay”
- You will need to add a delay for at least a few hours. Otherwise any visitor will immediately be added to your list once they complete the first event, regardless of whether they completed the transaction.

- Next, you will add an If/Then Branch (see image above). In the branch, click the “Contact completed the event” and select the next event in your conversion funnel. This branch asks “Did the visitor complete Event 2, Yes or No?”


- Next, you must tell the workflow what to do if the visitor did not complete Event 2. Under the “If No” tab, the lead should be added to your “abandoned conversions” list or lead nurturing workflow. In our example, this means that the customer made it to the shipping information screen, but never went to the payment screen, so he has abandoned his or her cart.

- Under the “If Yes” tab, you will add another delay.
- Add another If/Then Branch. At this point, it should look something like this:

- Under the “If No” tab, the lead should be added to the dropped conversion list.
- Under “If Yes”, the workflow should just end. This means the visitor completed a sale, so they should not be added to your abandoned conversion nurturing list.
- In the end, it should look something like this:

Now you can simply create an abandoned conversion lead nurturing workflow to reengage those lost leads.


.png)